Playing in 1v1 in CS:GO is just like in any game or sport. It’s the peak of competition, and no other factors can affect your performance aside from yourself. No more reasons, no excuses, just pure skill, and gameplay.
There’s no greater glory than defeating someone in a 1v1 in CS:GO. It doesn’t matter what their rank is. It doesn’t matter that there are no rewards. All that matters are the bragging rights you get after winning.
You can’t win if you don’t know how to set up 1v1 battles. So, here’s how to 1v1 in CS:GO in a few easy steps.
Set Some Ground Rules
The first thing you have to do is to set some ground rules. This ensures that you and your friend/s are all on the same page about what to do and how a winner is determined. This is especially important if you’re playing in a mini-tournament within your group and want fair and clean fights all throughout.
Here are a set of basic rules that most people use in their 1v1 battles:
- You can only use the agreed-upon weapon. Usually, players use rifles, Desert Eagles, or AWPs.
- Both players start with full health with Kevlar + Helmet.
- Any type of grenade usually isn’t allowed for pure aim battles.
- No planting/defusing the bomb or rescuing hostages.
- No camping since it defeats the purpose of 1v1s.
- The winner will be determined by whoever reaches the agreed-upon score first.
You can add your own twists or change a few rules to make your CS:GO 1v1s more fun. At the end of the day, rules are just made to create a fair environment for both sides.
Enable Developer Console
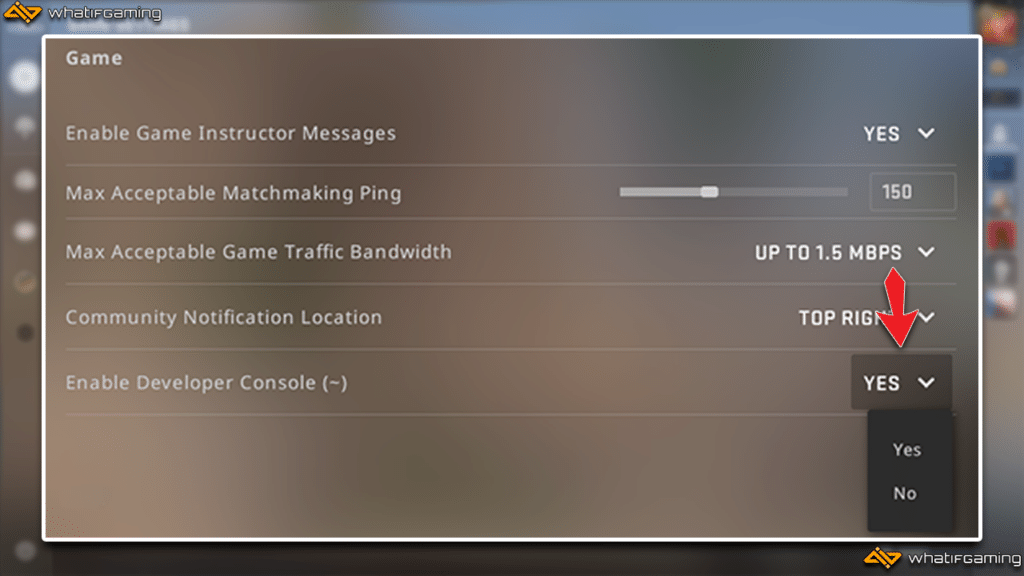
This is an important step since you’ll need to enter some commands once you’re inside the map. The Developer Console is a powerful tool that lets you add various commands and allows you to customize the game.
Here are the steps to enable the Developer Console in CS:GO:
- Open your game’s settings.
- Click on the Game tab.
- Find Enable Developer Console (~) and make sure it’s on Yes.
By default, you can bring up the Developer Console using the ~ key. However, you can customize this by changing the keybind found in the Keyboard/Mouse tab.
Find the Perfect Map

We’re only a couple of steps away at this point, and this is one of the most fun parts. Step three is choosing where the battle will occur. It really doesn’t matter how you decide which map you’ll play on. As long as you’re both fine with the map, then you’ll be good to go.
There are two different types of maps that you can choose from. You can choose any of the official CS:GO maps that you can play in Official Matchmaking modes or choose from the variety of 1v1 maps available in the Steam Workshop.
Using official CS:GO maps will allow you to practice not only your skills and aim but also your knowledge and mastery of these maps. I highly recommend playing on maps that you usually queue in Competitive mode with.
The downside of using an official CS:GO map is that they are typically way too big for 1v1s. This can make rounds last longer than they should. Sometimes, you might even end up running circles around each other.
Finding maps on the Steam Workshop that are specifically built for 1v1s is the fun way. These 1v1 maps are smaller and unique, making them new to both sides. This makes rounds way easier and more enjoyable.
Here are a couple in-game captures of some of the most popular 1v1 maps in CS:GO:
Typically these maps also already have the commands in place for 1v1 battles. This means that you can skip the next step and go straight to fighting it out on the battlefield.
Enter the Essential Commands

The final step is to use the appropriate CS:GO console commands. These commands will allow you to customize the game and help you create a comfortable 1v1 experience.
Here are some of the essential commands along with their functions
| Command | Function |
|---|---|
sv_cheats 1 | Used to enable cheats. A lot of other commands depend on sv_cheats to be enabled before they can work. |
mp_warmup_end 1 | Automatically ends the 5-minute warmup timer that starts when joining the server. |
mp_restartgame 1 | Restarts the game. |
mp_freezetime x | Determines how long players are frozen at the start of rounds. Set x to any number you prefer. |
mp_autoteambalance 0 | Prevents bots from joining teams to balance numbers. |
mp_limitteams 1 | Limits the number of players per team to ensure that bots can’t join the game. |
Here are our recommended commands that will make your 1v1s in CS:GO more comfortable to play.
mp_round_restart_delay 5 |
mp_maxrounds 30 |
mp_roundtime 50000 |
mp_match_can_clinch 1 |
mp_overtime_enable 1 |
bot_kick |
mp_freezetime 2 |
mp_ignore_round_win_conditions 0 |
mp_limitteams 1 |
mp_weapons_allow_map_placed 0 |
mp_death_drop_gun 0 |
sv_infinite_ammo 2 |
mp_free_armor 1 |
mp_startmoney "16000" |
mp_t_default_secondary weapon_glock |
mp_ct_default_secondary weapon_usp_silencer |
mp_t_default_primary weapon_ak47 |
mp_ct_default_primary weapon_m4a1 |
mp_halftime 1 |
mp_halftime_duration 5 |
mp_warmup_end |
mp_restartgame 1 |
Optionally, you can also use our config file and execute it when starting 1v1 games.
- Download the file.
- Open it and add in any extra 1v1 commands you’d like.
- Save the text into a config file by changing the Save as type to All files then attaching “.cfg” at the end of the file name.
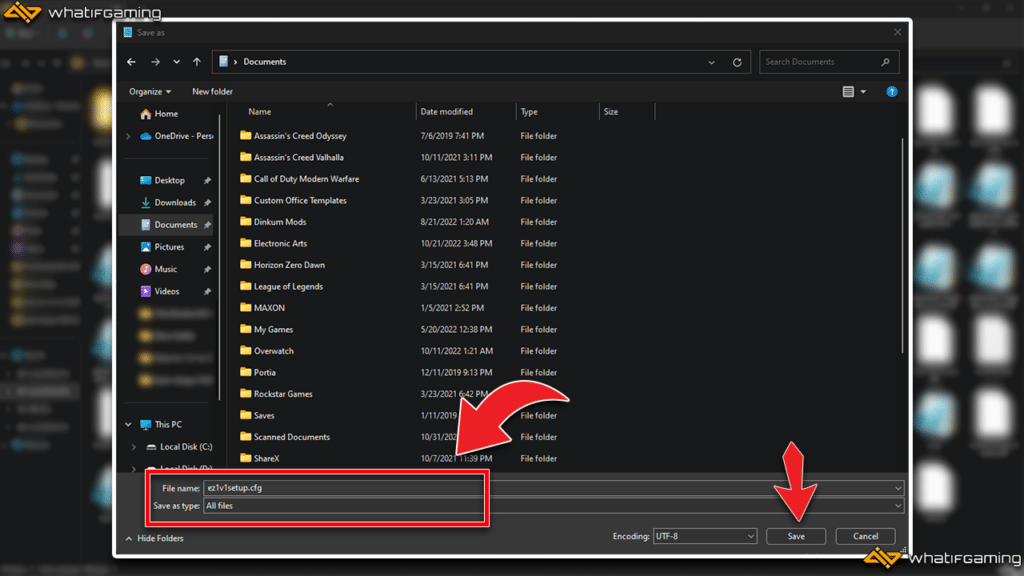
- Paste it into your CS:GO config folder, which can usually be found here: D:\SteamLibrary\steamapps\common\Counter-Strike Global Offensive\csgo\cfg.

- When setting up a map for a 1v1 battle, simply open the Developer Console, type in exec ez1v1setup, and press enter.
This should automatically run all commands for you, and you can go straight to enjoying your 1v1 battle.

