Marvel’s Midnight Suns is a tactical role-playing game developed by Firaxis Games and published by 2K Games. The title is out now on PC through Steam and the Epic Games Launcher, as well as current and last-gen consoles. Midnight Suns is an impressive title, especially the visuals, and is a big step from Firaxis’ last title, XCOM 2. The PC version runs fine for the most part, but like any other new release, there are a few technical issues. If you’re running into the Marvel’s Midnight Suns crash at launch issue, here are a few things you can do to fix that.
Fixing the Midnight Suns Crash at Launch Issue
Some users have reported that they can’t seem to start the title, or it crashes a few seconds after the boot. This is pretty common for new releases and mostly boils down to something missing on the user’s end. We have a few suggestions that can help you with this and allow you to start playing.
Verify Game Files
If you have been playing PC games for a while, you probably already know this one. In most cases, a crash at launch is usually an indicator that some of your files aren’t in order. A quick scan performed by the client can fix that in both Steam and Epic Games Launcher.
Steam
- Open Steam, and navigate to your library
- Right-click on Marvel’s Midnight Suns in your library
- Click Properties
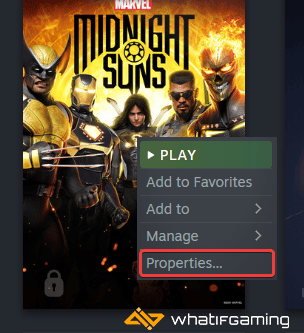
- Select the LOCAL FILES tab
- Click on Verify Integrity of local files…

After clicking this, a scan will start, and Steam will go through your files to check for anything out of order.
Epic Games Launcher
- Open your Library in the Epic Games Launcher
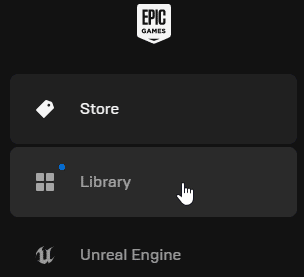
- Now, click on the three dots next to Marvel’s Midnight Suns
- Here, select Manage
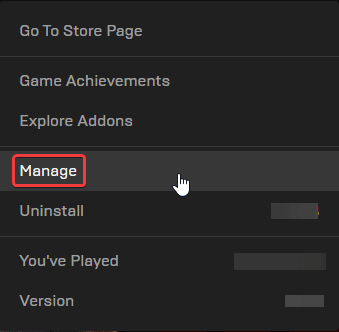
- Click on the Verify button next to Verify Files
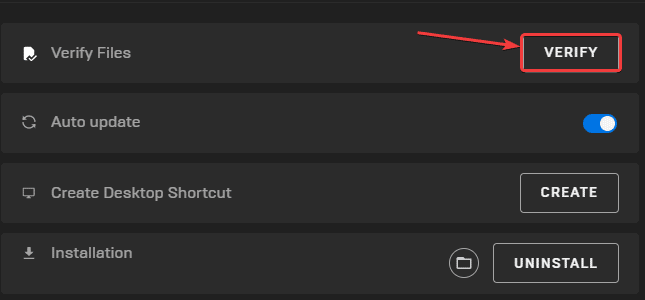
Like Steam, Epic Games Launcher will go through your game files and check the integrity of each file.
Update DirectX and Visual C++ Redistributables
Ensure that both DirectX and Visual C++ Redistributables are on the latest version.
Update your GPU Drivers
Make sure that you have the latest drivers for your GPU installed. You can get the latest ones from the links below.

Run the Game as an Administrator
It’s a good idea to give the game admin privileges so that nothing from the Windows side is interfering with the game. This isn’t usually a problem, but you can try it anyway.
- Open Steam and then your library
- Here, right-click on Marvel’s Midnight Suns
- Click Manage
- Then select Browse local files
- This will take you to the location Marvel’s Midnight Suns is installed in
- Right-click on the executable and select Properties
- Click the Compatibility tab
- Check “Run this program as an administrator“

Now, launch the game and see if that made any difference.
Add an Exception to Your Anti-Virus
Anti-virus software can sometimes flag games as threats, and it is especially common with third-party ones. This happened with XCOM as well, and it’s something that can possibly occur with Marvel’s Midnight Suns. It’s a good idea to add the game to your exceptions list to avoid any issues.
We have listed some popular ones and their respective FAQ pages.
- Windows Defender
- Microsoft Security Essentials
- Malwarebytes
- Avast Antivirus
- AVG Antivirus
- Kaspersky Anti-Virus
- Webroot SecureAnywhere
- McAfee Antivirus (Steam Support guide)
- Bitdefender
Switch to dedicated GPU (Laptop Users)
Ensure that your dedicated GPU is being utilized instead of the integrated one.
Switching to the Dedicated Nvidia GPU
- First, open the Nvidia Control Panel
- Then navigate to 3D Settings and then Manage 3D Settings
- Open the tab Program Settings and choose Marvel’s Midnight Suns from the dropdown menu
- Next, select the preferred graphics processor for this program from the second dropdown.
- Your Nvidia GPU should show as High performance Nvidia processor
- Save the changes
Switching to the Dedicated AMD GPU
- First, open Radeon Settings
- Then navigate to Preferences, followed by Additional Settings
- Here, select Power and then Switchable Graphics Application Settings
- Select Marvel’s Midnight Suns from the list of applications
- If Marvel’s Midnight Suns isn’t in the list, click the Add Application button and select the executable from the installation directory. This adds the game to the list, and you’ll be able to select it afterward.
- In the column Graphics Settings, assign the High Performance profile to the game.
Reinstall DotNet Framework
Like XCOM, it’s a good idea to repair the DotNet Framework. This will ensure that there aren’t issues with the launcher side of things. Make sure to reboot your PC after doing this.
We hope this guide helped fix Marvel’s Midnight Suns crash at launch issue. Let us know if you have any questions in the comments below.


