Dead Island 2 is a fantastic PC port and runs well on a variety of systems. Even though it’s an Unreal Engine 4 title, there are barely any stuttering problems, and there is support for FSR 2.0 as well. It is missing a few post-processing effects, though, which is a bit disappointing. If you want to disable the Dead Island 2 film grain effect on PC, here is how you can easily do that.
Disable the Dead Island 2 Film Grain Effect
Film Grain, as the name implies, adds a cinematic post-processing effect to a scene giving it the appearance of being “shot” on film. It mostly comes down to preference, but a lot of players like to leave it off. Dead Island 2 doesn’t let you disable it from the in-game settings, but
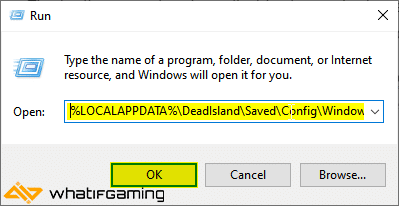
- Open Windows Run by either pressing Windows + R keys together or searching for it in Windows Search.
- Enter the following address, and press OK
%LOCALAPPDATA%\DeadIsland\Saved\Config\WindowsNoEditor
- Here, open the Engine.ini file using a text editor like Notepad, or Notepad++
- Now, add the following lines at the bottom of the file
[SystemSettings]
r.Tonemapper.GrainQuantization=0
r.Tonemapper.Quality=0- Now, save the file (Ctrl+S), and exit out.
This small change will disable film grain entirely from the game, and you can enjoy a much sharper, and cleaner image. Here’s hoping that the developers can add an option to disable it in-game as well, so that players don’t have to go through this.
Using a similar method, you can also disable chromatic aberration. If you’re running into any crashing issues, make sure to check out our handy guide. Some PC users have also reported controller issues, and we have a few suggestions for those too.
We hope this guide was helpful and you were able to disable the Dead Island 2 film grain effect on PC. If you have any questions, feel free to ask them in the comments below.


didnt work following exact the instructions.
Can you double-check if the engine.ini file is actually being updated?
I’ve tried this multiple times, the engine.ini seems to revert back to original each time i launch the game
Follow the method as normal, and after saving, right-click on the Engine.ini file, and select Properties. Check “Read Only”, and save. This will ensure that the file doesn’t default back 🙂
didnt work for me aswell
Follow the method as normal, and after saving, right-click on the Engine.ini file, and select Properties. Check “Read Only”, and save. This will ensure that the file doesn’t default back 🙂
both methods did not work for me
Are you sure that the Engine.ini file is actually saving the changes?
when i looked at the file i copy and pasted them and did not disappear