The K1 Communion Lost Sector in Destiny 2 isn’t the best for Exotic farming. It’s far from the fastest Lost Sector to run, but you can get down to four minutes per completion with a bit of practice. That’s not bad, but it’s far from optimal. Keep in mind that I ran K1 Communion on Legend for the majority of this guide. I did do a Master run, but the increase in Champions and lack of heavy ammo means runs can last upwards of eight minutes, which is significantly worse than the four minutes you can manage on Legend.
I’ll be going over Destiny 2‘s K1 Communion Lost Sector in detail for Season of the Seraph. I’m going to be as in-depth as possible, covering the modifiers, the Champions, what loadouts and builds you should run, as well as a play-by-play of how to approach each section of the Lost Sector.
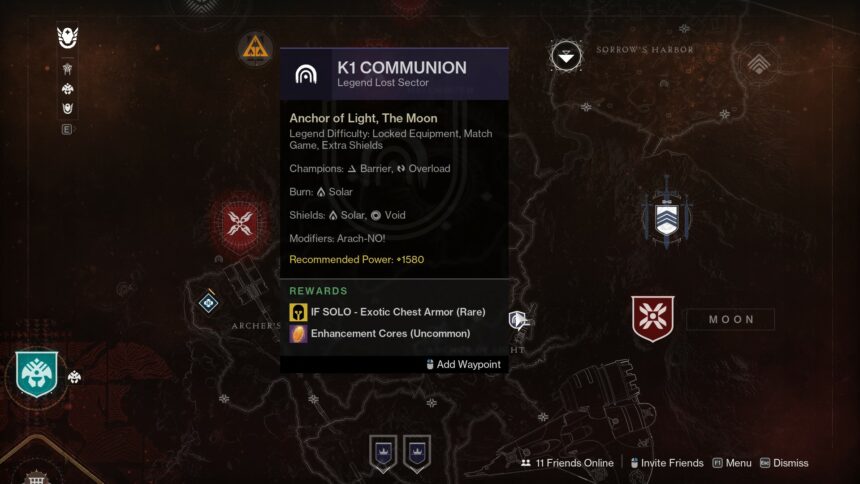
K1 Communion Lost Sector Guide
Average completion time: 4 minutes.
K1 Communion Lost Sector Modifiers
Champions

- Overload – The K1 Communion Lost Sector is pretty balanced as far as Champions go. You’ve got two Overloads to deal with, neither of which is in a particularly troublesome position. We have Overload SMGs/Auto Rifles this season, as well as Overload Scouts.
Le Monarque is always a good option if you’re not in the mood of running an Overload Champion Mod. This is especially true for K1 Communion since you’ll have Void shields to contend with. Void and Stasis grenades also got an anti-Overload mod this season, if you want to go that route. Void has never been more popular, and with mods now being free, it’s pretty easy to put together a solid grande build to take advantage of that mod and free up your weapon slots.
- Barrier – You’ve got two Barrier Champions here, and again, they’re not particularly hard to deal with. As always, each class is capable of outputting enough damage to nuke Barriers before they get their shield up, with Warlocks having the easiest time of things.
Mod-wise, we’ve got Anti-Barrier Bow, meaning Strident Whistle will be a tier-one option. We also have Anti-Barrier Pulse, which clashes with Revision Zero, but both of those are decent options. Of course, your best bet is going to be Arbalest. That’s what I used on my Hunter and Titan – a Warlock Starfire Protocol build has no issues taking down Barriers without specing against them, so I used Witherhoard then.
Shields

The featured shields for K1 Communion during Season of the Seraph are Solar and Void. At least, that’s what the modifier will tell you. In reality, you’ll only have to deal with one of each shield – both of which are only on red-bar enemies. If you don’t have great burst DPS, you will have to deal with an additional Void shield during the boss fight, though.
Again, Le Monarque is a quality option for this Lost Sector because of its Void element and ability to stun Overloads. However, you don’t need to spec around these shields too hard. You should be trying to run Solar, anyways, because of the burn, and Void Linears are at the top of S19’s META, so a Solar/Void primary with a heavy of the opposite element is the ideal setup.
Burn – Solar

K1 Communion’s burn during Season of the Seraph is Solar. This lines up with Solar shields being featured, and makes this Lost Sector infinitely easier for both Titans and Warlocks. Hunters, on the other hand, won’t really be able to take advantage of it. That being said, Blade Barrage with a Radiant Throwing Knife Well of Life build will work, just not as well as the alternatives.
Warlocks get the benefit of combing Solar burn with Starfire Protocol, resulting in damage high enough that you can straight up ignore the boss with a Well, and take down Barriers without an Anti-Barrier mod.
Hammer Titan is still busted, capable of insane DPS and survivability with Loreley. They’ll probably have the easiest time out of all three classes.
Arach-NO!

Arach-NO! spawns slow mines whenever you kill a Vandal. This isn’t usually a problem in Lost Sectors, but it’s an absolute pain in K1 Communion. There are a ton of Vandals, and if you run an SMG like me, that means you’re going to be in close contact with them, so the mines will go off almost instantly.
If you’re having issues with the mines like I was, make a point of destroying any mines that are in particularly bad spots.
K1 Communion Lost Sector Loadout Recommendation

- Arbalest
Arbalest is a go-to anytime you’ve got Barrier Champions to deal with, and there are a few reasons for that. For one, it can break their shields in one shot. It’s also capable of outputting great damage, so you don’t need to switch it out after breaking a shield. On top of that, it takes advantage of Linear Fusion ammo mods, letting you farm ammo for both it and your heavy at the same time. Oh, and it pierces regular shields, so you can use it instead of specing against whatever shields are present in the activity you’re playing.
- Calus Mini-Tool / Funnelweb
We have Overload SMG this season, so either of these is going to be my go-to (Ikelos SMG for Arc). If you’re running Void, a god-rolled Funnelweb will put in work, as will a god-rolled The Hero’s Burden if you’re a Gyrfalcon’s main. If you’re not using an SMG here, you’ll need to figure out another way to deal with the Overloads.
- Threaded Needle
Those around for Season of the Chosen probably have an old Clown Cartridge / Vorpal Threaded Needle collecting dust in their Vault. Firing Line isn’t usable while solo, so Vorpal is preferred here. Alternatively, you could run a Stormchaser or Cataclysm, but you’ll need to be aware that you’re giving up a Void weapon if you do that (there is only one Void shield, though).
Weapon Alternatives
Kinetic
Witherhoard

Witherhoard was my go-to Exotic weapon when I ran K1 Communion on Warlock. If you’re capable of the type of burst DPS that Starfire Protocol affords you, then you can skip speccing against Barrier Champions altogether. That frees Arbalest up from your Exotic slot, which I recommend filling with something like Witherhoard – especially for other Starfire users.
Energy
Le Monarque

You’ve got Void shields and Overload Champions in the same Lost Sector, and you know what counters both? Le Monarque.
If you’re willing to dedicate your Exotic slot to your primary, Le Monarque will take a lot of the stress out of running this Sector. Your overall DPS will hurt as a result, but you’ll have a much easier time dealing with the Champions, as well as the sniper Vandals.
Heavy
Parasite

Parasite might be the actual go-to strat here over Witherhoard and Arbalest, but I didn’t run it all that much myself. That being said, a Worm’s Hunger x20 will one-shot all the Champions, and take out half of the boss’ health. It’s an incredible tool that I would almost recommend over everything else on all classes.
Destiny 2 K1 Communion Lost Sector Walkthrough
Section 1 – The Opening

The start of the K1 Communion Lost Sector is as easy as this activity is going to get. It’s one relatively small room, with a door that’s blocked off until you kill all of the Adds inside.
Waves of Vandals and Dregs will spawn from the ceiling – about four waves or so, before a Barrier Champion spawns. The size of the room will work against you while fighting this Champion, but there aren’t too many enemies for it to immune.
If you can burst down the Champion before it has a chance to get set up – do. Warlocks need to take advantage of their Fusion Grenades here, while other classes will want a mix of their abilities and whatever their heavy DPS weapon is of choice.
I want to reiterate that a Worm’s Hunger x20 Parasite, which you can reach in this room, will one-shot this Barrier Champion and eliminate the need for any funny business.
Section 2 – The Big Room

In my opinion, this section is the hardest in the entirety of the K1 Communion Lost Sector. You’ll drop down into the back of the room, with various enemy spawns set up between you and the door.
Take out the Dregs and Shanks on the initial platform, then you have a decision to make. The biggest threat in this room is the two sniper Vandals on the catwalk at the front, above the door. The other Vandals that will spawn off to the left-hand side are difficult to deal with, as well.
If you have a ranged weapon like a bow, sit at the back of the room and take the two snipers out. From there, you can choose to go left or right. The left side of the room has more Vandals and is more close-quarters, but does give you the high ground over the rest of the room. However, doing this means dealing with the Arach-NO! mines, so bear that in mind.
If you can’t take out the snipers at the beginning of the room, this is the route I recommend. Close the distance between you and them so that you can kill them ASAP.
Your other option is the right-hand side. You’ll mainly be dealing with Dregs here, and you’ll have access to all the cover you could ever want. However, it can be tricky getting angles on enemies here – especially the Barrier Champion that will spawn towards the end of this section.
There will be a red-bar Void shield Servitor in this room that you’ll want to kill after the snipers. A single Starfire Fusion gets rid of its shield, but you can use what you want for that.
After it, and some more Adds are dead, that aforementioned Barrier Champion will spawn in.
This Champion is a much bigger issue than the one at the start of the Lost Sector. There are far more enemies for it to immune, and you’ll be taking a lot of damage while trying to kill it.
If you went right, you’ll have a tricky time dealing with it if it teleports awkwardly. Those on the left won’t have that issue.
Deal with the Barrier and the rest of the Adds to unlock the doorway to the next area.
Section 3 – Interlude
This is a short section that joins the boss room and the big room together. There’s not too much to talk about – you’ve got two invisible Mauraders to deal with first. After that, you’ll have a wave of Wraiths and Vandals, along with an Overload Champion.
This is about as easy as fighting an Overload is ever going to get. It’s easy to isolate it, at which point you have free reign to take it down in whatever way you see fit.
After that, it’s just a short jog and a couple of Adds to the boss.
Section 4 – Boss Room

The boss room is a circular arena, with enemies spawning on three of the four sides (not the one you enter the room from). Before you go charging in, though, take a breather and relax by the door. After a second or two, another Overload Champion should come rushing toward you. I recommend staying in the doorway to take him out. That way, you’re safe from the Adds that will be pelting you from every direction.
After dealing with the Overload, hang a right, killing Adds as you go. You’ll come to a section with two levels – this is where I recommend hovering until you spawn the boss. You’ll have easy access to most enemy spawn locations from here, including one on the top and bottom levels.
Whether you go right or not, take some time to kill the Adds in this room and a Solar shield Heavy Shank will spawn. Kill it, and the other Shanks that came with it, and the boss will spawn.
I mainly ran K1 Communion on my Warlock (in case that wasn’t obvious). My strat for the boss involved dropping a Well right in front of the doorway he runs out of and just letting him have it with my Fusions and heavy weapon.
Regardless of what I was using, I was able to comfortably kill the boss within my Well’s duration here, although Parasite worked best. After that, it was a quick jump to the chest and a sprint to cover so that I could return to orbit.
If you have to do this fight the hard way, I recommend backtracking toward that entrance door again. This is a safe spot that will offer you decent lines of sight on the areas the boss likes to go to, so you can whittle him down from a distance. Bear in mind, if you do the fight this way, you’ll have a lot of Adds (including Exploder Shanks) that other players won’t have to deal with.
Class Guides for K1 Communion
Titan

Heart of Inmost Light is still killing it in the current META, so that’s definitely an option you should consider. However, that will mean you lose your Solar utility (and that burn), as well as any Void utility you may have wanted to use against the shielded Servitors.
Personally, I can’t see a reason to not run Solar, though. Not only do you get to take advantage of the burn, but your access to healing is simply unparalleled. Pair it with Loreley, or Synthocepts if you’re feeling brave, and you’ll fly through the K1 Communion Lost Sector like it’s nothing.
Hunter

Gyrfalcon’s is your only play, and I don’t want to hear the Arc loyalists try to tell me otherwise (Arc probably will work with the right build). A Gyrfalcon’s Hauberk Void build is so good for this Lost Sector, and others, that it’s what I used to run Master K1 Communion.
Pair it with a Void primary and you’ll have access to good damage and insane survivability. I don’t think I died once on my Void Hunter while running the Sector. You will need to make up some DPS, though, so consider pairing this subclass with Parasite.
Warlock

Solar Warlock was my go-to, and that’s because Starfire Protocol pairs perfectly with Solar burn. Starfire Fusion Grenades are capable of nearly one-shotting all the Champions in this Lost Sector. If you stick one with a grenade and get a precision hit with your Linear, that Champion will die. This lets you bypass Barrier Champions, but not Overloads. Two grenades will be a complete kill if you’re ever in a bind and need to deal with one quickly. Although, Overloads will still need to be stunned.
You also have access to Well, which as I mentioned can be put right in front of the boss’ spawn for an easy fight. Alternatively, you could go for Void Warlock for some more grenade shenanigans, this time with Devour. Either one will work.


