
Allocating more RAM to Minecraft is a relatively straightforward process and can yield massive benefits such as reducing lag and making for a smoother experience across the board. Allocating more RAM to dedicated online play is a little more complicated, however – have you ever wondered how to allocate more RAM to your Minecraft server?
If so, you’ve managed to navigate the maze that is setting up your own server in the first place. You’re all set with the latest version of Java, and after a lot of blood, sweat, tears and copy-pasting of computer commands from the officially endorsed Minecraft tutorial, you’ve finally given your fellow Minecraft survivalists a home of their own. Well, technically it’s a home of your own, but hey, your hospitality knows no bounds.
Or maybe you’re a little more experienced with this stuff and breezed through the whole process no problem.
Either way, you’ve got your server, you’ve got your pals, you’ve got plenty of time to put into joyous hours of multiplayer Minecraft. What you don’t have is quite enough RAM on the server to support the number of players you have queued up for entry and still offer a smooth experience.
Whether you’re a newcomer to the world of server hosting or a seasoned veteran, this handy step-by-step guide will tell you everything you need to know about allocating more RAM to your Minecraft server.
First Thing’s First
Before we get into the technical details of how to allocate more RAM to your Minecraft server, it’s really important you make sure you know what you’re actually trying to do.
It may sound silly, but messing around with RAM allocation blindly could potentially have some… undesirable effects, not just on your server but across your whole PC.
Therefore the very first thing we’ll want to do is check how much RAM we have available to work with.
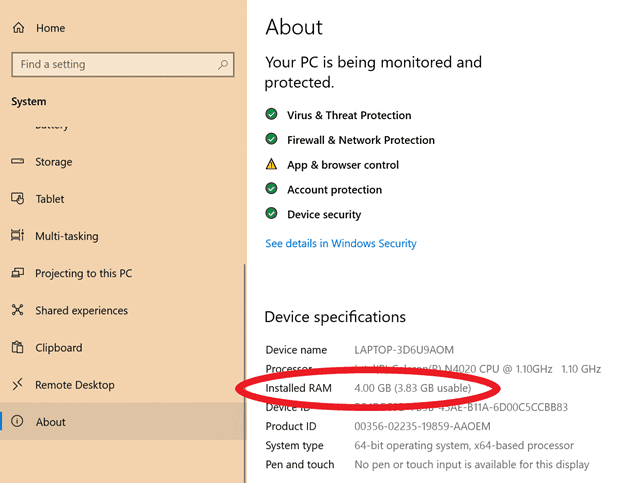
If you’re working on a Windows PC, you can do this by clicking the start button, selecting Settings, and navigating to the bottom of the menu where you’ll find the ‘About’ option. Click it and you’ll be greeted by the screen below – this is where you’ll find your device’s RAM specifications, including how much RAM you have to spare. This interface may change between different versions of Windows, but the principle will remain the same.
If you’re on a Mac, it’s a similar story – just head to the Apple icon in the top right, select ‘About this Mac’, and navigate to the memory tab. This will tell you how much RAM you have installed and give you a breakdown of memory slots.
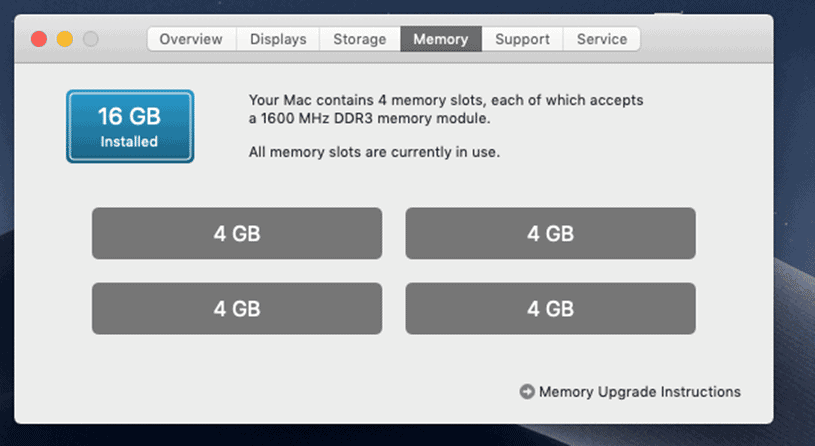
You can also use the Activity Monitor application to see a breakdown of how much memory individual processes are using on your computer, which may help you decide how much RAM you can afford to spare on your Minecraft server.

This information will inform the exact commands you use to allocate more RAM to your Minecraft server, so you don’t want to cut this corner!
How to Allocate More RAM to Minecraft Server Using Commands
Once you’ve established how much RAM you can afford to allocate to your server, you’ll need to return to your old friend cmd.exe (or the Command Prompt) if you’re a Windows user, or alternatively Terminal if you’re on a Mac.
Unless you use a Windows batch file (we’ll talk a bit about that later) or the Java shortcut, you’re probably fairly used to the process of launching your Minecraft server through system commands. If this is the case, your usual command interface will probably look something like this:

It’s that last bit of code:
java -jar [your server file name].jar
that ultimately launches your server, and it’s this bit of code you’ll need to play with to change how much RAM it is allocated.
Fortunately this is about as simple as it could be. All you need to do is add a few additional pieces of information when you’re launching your server. Easier said than done, but luckily for you we have the exact code you’ll need right here for you to copy into your Command Prompt/Terminal window:
java -Xmx[RAM in MB]M -Xms[RAM in MB]M -jar [your server file name].jar
1GB RAM Example: java -Xmx1024M -Xms1024M -jar [your server file name].jar
2GB RAM Example: java -Xmx2048M -Xms2048M -jar [your server file name].jar
You’ll notice all that’s changed is that we’ve added a few things in the middle of the original command. The next step is to substitute the [RAM in MB] parts with, as you may have guessed, the amount of RAM you want to allocate to your Minecraft server in megabytes.
In the example below, we’ve decided to allocated 1 GB of RAM to the server. In megabytes this is roughly 1024 MB, so that’s the figure we’ve gone with:

As this is actually now the input suggested by Minecraft on their server download page, you may be rolling your eyes at this guide telling you what you already know. Not a problem – to allocate more RAM than just 1 GB, simply adjust the numbers in the line to reflect how much GB you want to allow the server to use. Calculating what this is in MB is really easy – just multiply 1024 by the number of GB you want and use the resulting figure in the line.
As you can see from the example above, upon entering this command your server should launch as normal (well, not entirely as normal – if the extra RAM is having the desired effect you should be seeing a noticeable increase in the speed of the launch!) and you’ll be able to jump in to your Minecraft server with a little extra support from your machine.
How to Allocate More Ram To Minecraft Server in a Batch File
Now, as you know, using Command Prompt or Terminal to launch your server gets the job done, but it sure takes a minute.
So is there a way to make the whole process a little less… wordy?
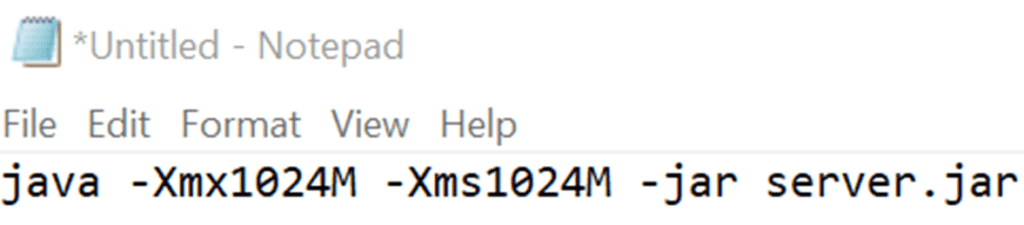
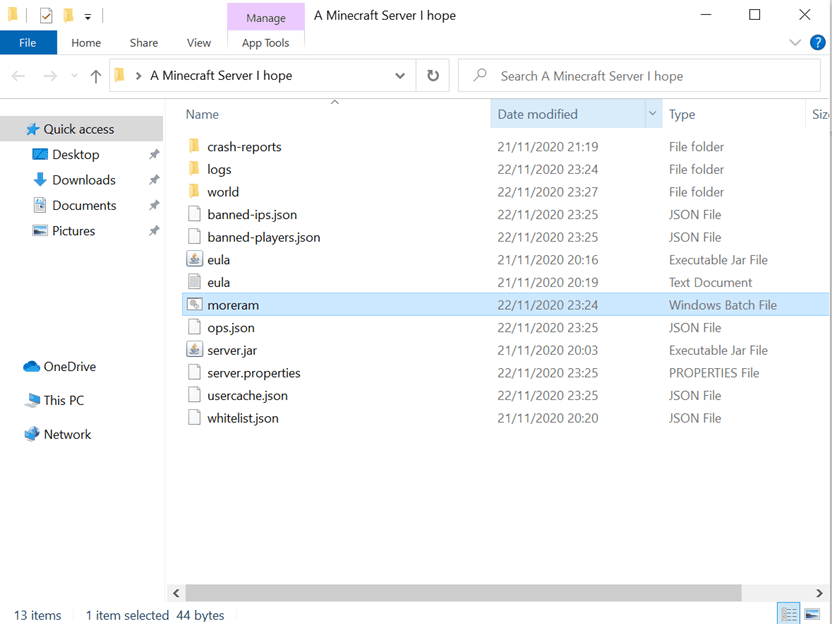
Where there’s a will, there’s a way. On Windows it’s easy – all you need to do is put together a batch file comprising of the code we just explained. You don’t even need to go into Command Prompt to do this: all you need is the humble Windows Notepad. Simply type out the code as we’ve done below (remembering to replace the numbers for the amount of RAM you want to allocate and the server name with your own), and then save the file with whatever name you want and (this is the important bit), the extension .bat.
This extension probably won’t be shown under the drop-down ‘save as type’ menu, but that’s not a problem – if you include the extension Windows will recognize the text file as a batch.
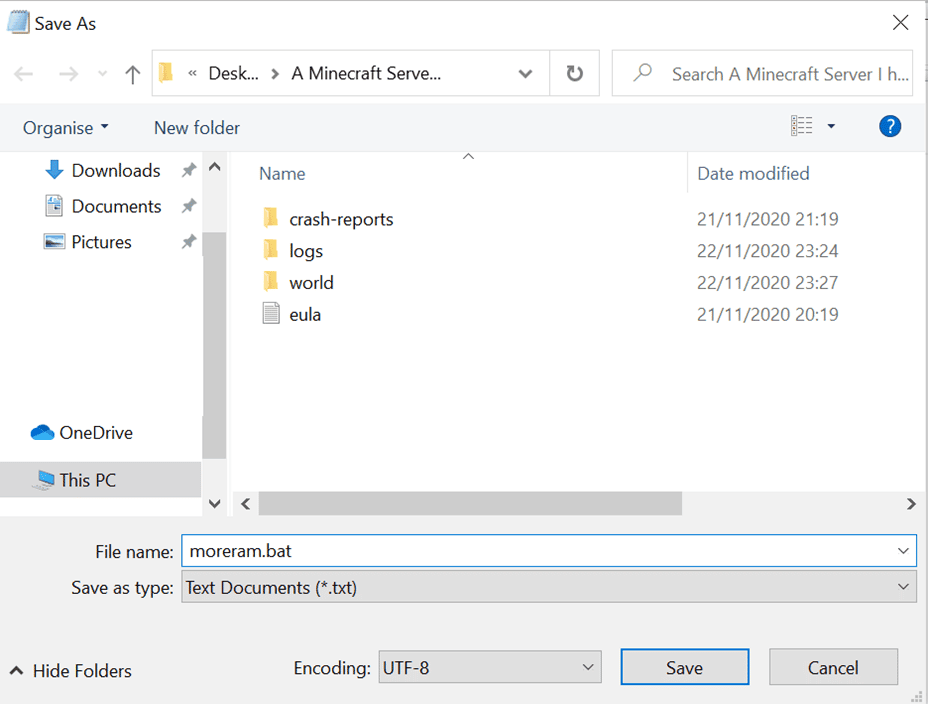
Make sure you save this file in the folder where you keep your server – the batch will be useless in the wrong location.
Once you’ve done this, simply go to your server folder, open up the batch file and the code will run automatically, launching your server, extra RAM and all.
Because Terminal operates a little differently to the Command Prompt, it’s a bit more challenging to make a text file executable on a Mac – but it can be done. For details, see this support page: https://support.apple.com/en-gb/guide/terminal/apdd100908f-06b3-4e63-8a87-32e71241bab4/2.10/mac/10.15?fbclid=IwAR1x5hF02PmyOh8Fz-7s4A0VLn8Jvowsrfiv-7gonoXfzSLGldV0Xdag3zA
We hope this guide has been of assistance in setting up a Minecraft server with the capacity you need. Good luck, and happy crafting!