Getting the Protorelic in Junon requires winning a few matches of a tower defense game called Fort Condor. We’ve curated this guide to teach you the basics of Fort Condor in Final Fantasy VII Rebirth and win all of your matches effortlessly. So, let’s get into it without further ado!
First, let us take a look at the rules and all other mechanics involved, and then we’ll talk about an effective strategy that can help you win even when playing on the Hard Mode.
The Basics

Fort Condor is a tower defense game in FF VII Rebirth where two teams duke it out while trying to push their pieces into the other player’s stronghold and destroy it. There are two lanes on each board that you can use to push and defend against an enemy attack.
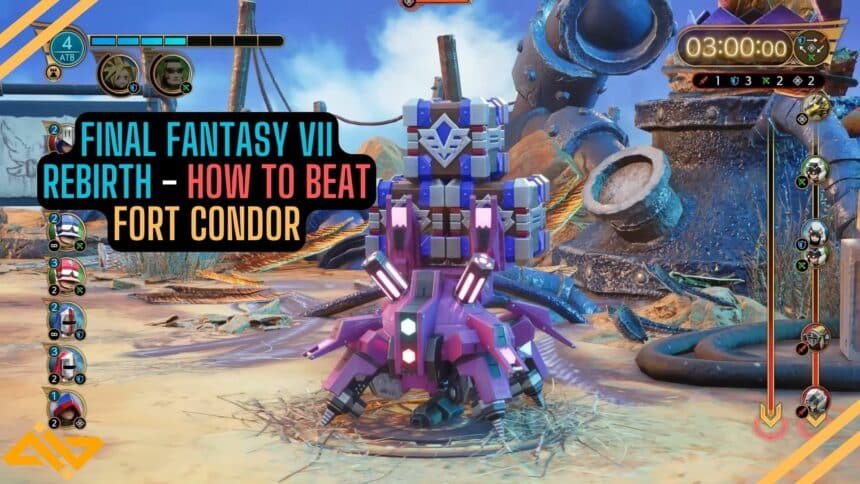
Focus on the image we’ve added above. You’ll see that some information about the board’s situation is being displayed.
- Top Left: An ATB gauge that lets you know how many charges you have and which units you can call at that moment.
- Middle Left: Indicates which units you can access and which ones you can deploy at that moment based on how charged your ATB gauge is.
- Top Right: A timer showing how much time remains until the match ends. (You have to destroy the enemy’s stronghold in the given time to win)
- Middle Right: Showing the lane status. Keep an eye on this gauge to determine which lane units will come from and react accordingly.
Your task is to choose an appropriate unit/hero combination and keep deploying troops based on the kind of retaliation you are facing in each lane. Pressure, and advance into the enemy’s stronghold to defeat them.
You’ll soon be hitting the beaches of Costa Del Sol after Junon. Wanna know how to get all swimsuits in FF7 Rebirth? We’ve got you covered!
How to Play Fort Condor

Now that you are familiar with the basics, let’s talk about how to actually play the game. As we’ve mentioned above, the ultimate task is to choose an appropriate unit/hero combination and keep deploying troops based on the kind of retaliation you are facing in each lane.
First, you’ll need to choose an ally unit and two hero units that suit your playstyle. These units and the pawns you get within them will defer based on how offensive/defensive you want to play. There are three main unit types in Fort Condor; Sword, Shield, and Arrow.
- Cloud represents the Shield Hero Unit. | Shields can help tank damage and break through enemy lines.
- Tifa represents the Sword Hero Unit. | Swords allow you to quickly gain ground and deal increased damage.
- Berret represents the Arrow Hero Unit. | Archer units can deal with flying units and deal damage from afar.
The match starts once you’ve finalized your units. Now, you need to check the right side of your screen to see how the enemy places their pawns and then make your move based on that judgment.
Each pawn in your unit requires a certain number of ATB charges to be deployed. Regular pawns require 2, while Elite pawns require 3 ATB charges. (Hero Units don’t require any ATB charges)
As your pawns cross the middle section of the map and occupy more space, you’ll be able to deploy more units further ahead on the map. Have a strategy in mind about which lane you want to push from.
While each match plays out differently depending on the enemy’s unit selection, we’ll still tell you an effective strategy that can help you win most of the Fort Condor matches in Final Fantasy VII Rebirth.
Effective Strategy
Here’s a strategy we’ve used while playing Fort Condor in FF7 Rebirth to win all of the matches and obtain the Protorelic:
- Go with the Safeguard Defense-Focused ally unit & choose the Barret/Tifa hero unit.
- Start by deploying an Elite Enforcer, a Cleric, and a Ballista in the more crowded lane. (This should allow the Enforcer to creep up and occupy more space).
- Once you have occupied space ahead of the midpoint, deploy a Trebuchet somewhere in the middle of the enemy territory and hammer their stronghold.
- Dont neglect the other lane. Deploy a Ballista in the back and a few archers near the tower to deal with any stragglers.
- Keep balancing the unit deployment based on the type of pressure you are dealing with in each lane. Keep the goal simple: You need the area ahead of the midpoint to deploy your Trebuchets.
- Once your Hero Units are charged, you should use them with other Elite units for a good push into the enemy’s base. (Since they don’t require any ATB charges).
- Trebuchets, Hero Units, and Enforcers can help you break through the enemy line and topple their stronghold with ease.
The same strategy can help you win the Hard Mode matches after getting the Protorelic. You’ll have to actively monitor which lane the enemy is pressuring and adapt accordingly as Hard Mode A.I tend to get quite aggressive.
Hard Mode might require some trial and error before you can nail the perfect strategy and unit deployment balance. So, don’t give up, and study the lanes well before deploying your troops.
And that, ladies and gentlemen, is how you play Fort Condor in FF VII Rebirth and emerge victorious without struggling too much. Enjoy the mini-game, and if you like this guide, visit WIG to check out the rest of our Final Fantasy VII Rebirth coverage!


