If you’ve noticed that your PS5 is getting hotter than usual or is making too much noise, maybe it is time to clean the console before things get out of hand. But where to start? How much knowledge do you need to clean it? Learn all that and more in this guide, where we teach you the right way to clean your PS5 without damaging anything.
We’ll also list out the tools you’ll need to clean the PS5. Don’t worry. Even if it might seem like a daunting task, we promise that it won’t be. Let’s get Started!
Cleaning the PS5

Before we start the cleaning process, let me list the tools you need to have on hand for the whole process. These tools will let you clean your PS5 from Basic to Intermediate levels.
- Pressurized Air Canister
- A cleaning brush
- Pliers
- A T8/T9 Screwdriver
Stage 1

Follow these steps to perform the most basic cleaning and get rid of any loose dust that might be clogging your PlayStation’s airflow.
- Place the console on its side (in the horizontal position)
- Grab the side panel from the edge and pull it to the opposite side while lifting it upwards to remove it. (do this for both sides)
- You’ll now see the air vents.
- Use the cleaning brush to remove any solid dust on the inner side of the side panels. (do this for both panels)
- Do the same for the air vents on both sides.
- This will take care of any dust blocking the vents and clean up the panels as well.
This should be enough for you if you live in a clean environment and regularly clean your PS5. But if you still feel like your console is heating up, there are better ways to clean it.
Stage 2

And now we head into cleaning that requires slightly more labor. It’s all pretty basic though, so you should be good if you follow our instructions to the T. Your side panel should already be opened up if you are coming from Stage 1.
We are now going to remove the PS5’s Cooling Fan, Vents, and Adhesive Strip to clean it further. Keep checking the image above and follow these steps:
- Pull the vent from the leftmost corner and lift it upwards, as the arrow indicates in the image above. (Do this for both sides) (Step 1 in the image)
- Remove the 4 screws securing the cooling fan using ta T8 or T9 screwdriver. (Steps 2-5 in the image)
- Use any sharp object to wedge and lift the adhesive strip from the right-most corner. Then, take off the adhesive strip to expose the fan’s connector. (Step 6 in the image)
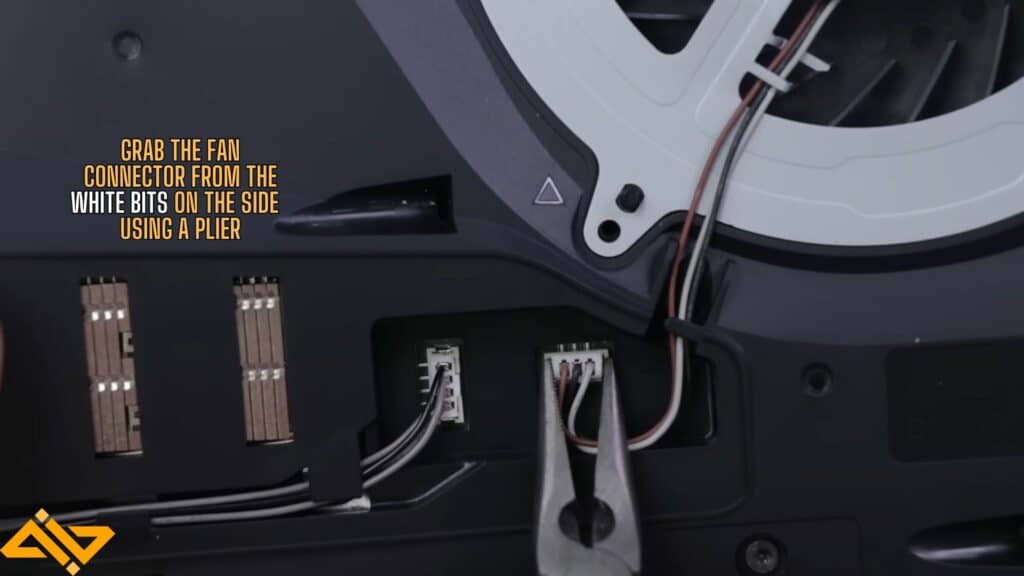
- Now remove the fan connector by grabbing it from the sides, using the white bits, and gently pulling it up. Be careful here.
- Now, you should be able to lift the whole fan up and clean it properly using the cleaning brush and pressurized air.
- You should also clean up any dust inside the fan’s housing and use pressurized air to clean the interior or the cavity as well.
- To assemble everything again, simply follow the same steps in reverse.
This should be decent enough cleaning to fix any overheating issues with the PlayStation 5. You should repeat this cleanup routine every few months to ensure that your console remains in pristine condition.
Check out our guide on how to add external storage to the PS5 if you are running low on space for your games. Stick with WIG for more informative & fun content where we cover games, news, tech, consoles, and much more!


