Nier Replicant is a remaster of the original Nier that came out in Japan only. It features a different protagonist than the one playable in the western release and other changes. The remaster has been something PC players have been asking for years now, and Square Enix finally delivered. Sadly, similar to Nier Automata, the PC port isn’t that great. It lacks a lot of features you would expect from a modern title and has a bunch of technical issues. If you want to fix the Nier Replicant Ultrawide issues on PC, here is how you can do that.
We have previously covered other issues of the game, including stuttering problems with the controller, and the FPS issue as well. Nier Automata hasn’t been patched in years, and we hope Replicant doesn’t share the same fate. This is incredibly disappointing on Square Enix’s end because a lot of their titles are usually optimized well for PC, but both Nier games have mediocre ports.
Fixing the Nier Replicant Ultrawide Issues
Nier Replicant is another modern PC title that sadly doesn’t have ultrawide support. This is frustrating for users, as a lot of PC gamers are moving to ultrawide setups, to get the most out of their hardware. You can still fix this by manually editing the executable using a hex editor. Follow the steps below to do so.
Download and install HxD
- First, you need to download and install the HexEditor
Locating the executable
- Open Steam
- Right-click on Nier Replicant in your library, and then Manage, and finally Browse local files

- This will take you to the location, and you can locate the executable here
- It is called NieR Replicant ver.1.22474487139.exe
Launch and use HxD
- Now, launch HxD
- Simply drag the NieR Replicant ver.1.22474487139.exe into the application, and a bunch of hex values will show up

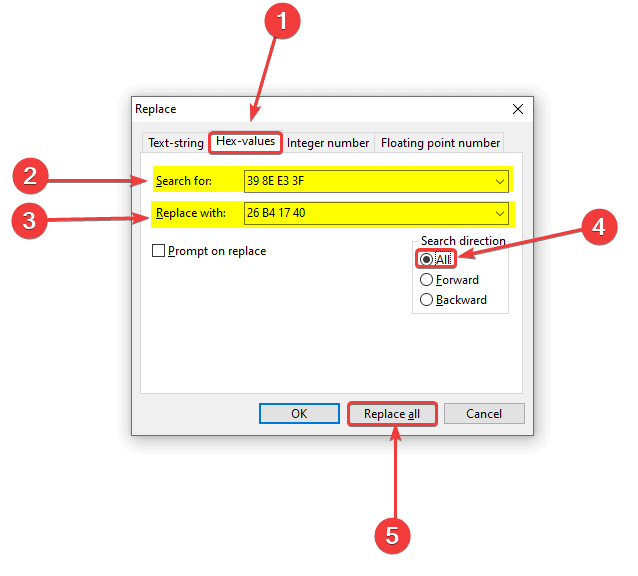
- Press CTRL+R, and then select Hex-Values
- After this click on Search Direction “All”
- For this guide, we will be targeting 2560×1080. You can view the hex values for other popular resolutions below.
- CD CC CC 3F for 1440×900
- 00 00 A0 3F for 1280×1024
- 26 B4 17 40 for 2560×1080
- 8E E3 18 40 for 3440×1440
- 39 8E 63 40 for 3840×1080
- 9A 99 19 40 for 3840×1600
- 00 00 A0 3F for 4120×1024
- 39 8E 63 40 for 5160×1440
- AE 47 A1 40 for 5292×1050
- AB AA AA 40 for 7680×1440
- In the search Window, you want to enter 39 8E E3 3F and replace it with 26 B4 17 40 for 2560×1080
- Click on Replace All
Remove Black Bars
- Moving on, press Ctrl + F to bring up the Search Window, and click on the Hex-values tab
- Set Search Direction to All, and then click Search All
- Here, enter the 00 00 10 41 00 00 50 41 00 00 80 41 00 00 00 00, as shown below

- Press OK, and this will take you to where the value is in all the hex-values

- Now, you want to replace the 80 41 part with either of the values below, depending on your aspect ratio
- AC 41 for 21:9
- 00 42 for 32:9
- 40 42 for 48:9
- Simply, copy the value, for example AC 41, and highlight 80 41 in the result

- Right-click and select Paste insert, as shown below
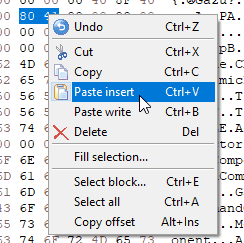
- It will update to the one you paste, as shown below

- That’s it! Save (Ctrl + S) the file and exit out.
We hope this guide was helpful. If you have any questions, feel free to ask them in the comments below.


I need help with the hex values for 5760 x 1080 please!
Try this 1CC7B140 🙂
Thank you, i will and i’ll report back
Thanks man.. It definitely worked! The npc’s and enemies don’t appear until I’m really close to them, but don’t think there is much I can do to change that, either way you did your part and delivered me the values and I greatly appreciate that! thx again!
Not a problem! I’m happy I could help in any way 🙂 Enjoy the game!
Can’t make it work for 4:3 aspect ratio.
thank yoooooooou . its work
Glad I could help! 🙂
Hi,
Can’t find the value for removing the black bars with a 16:10 screen (steam deck).
Any ideas ?
Just tried,
It actually doesn’t increase resolution. Just inflates pixels horizontally to fill image in widescreen. So the circles became ovals and squares rectangles.
Am I doing something wrong?
There might be something you’re not doing right. There’s also an automated script that does all this for you. Give that a try. You can download it from Github below.
https://github.com/PineappleIOnic/Nier-Replicant-Ultrawide-Patcher/
Thanks!
You’re welcome! 🙂
Hello, any trick to put star ocean the divine force in ultrawide?
Hey, seems like ther aren’t any fixes by community members, but there is a workaround that lets you play in UW by downgrading the game to 1.0 version.
You can watch the guide below:
https://youtu.be/lhhiBOvYAsw